Gutter Guard Installation

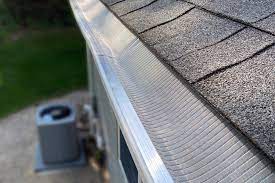
These gutter guards keep out larger debris, rodents, and twigs while letting water flow through. They’re also less likely to clog than some other types of gutter guards. For more information, you can visit Roof Cleaning Mt Pleasant to proceed.

Avid DIYers with a sturdy ladder can install these guards independently, but taking safety precautions while working at heights is a good idea. Expect the project to take a few hours to a couple of days.

Gutter guards can save homeowners significant money by reducing the need for expensive gutter cleaning and repairs. However, the initial cost of installing the system can be a barrier for some. Some factors that determine the cost of gutter guards include the size of the home, the type and amount of vegetation around the house, and the installation method. It’s also important to remember that a one-time investment in a well-designed and installed gutter cover will reduce maintenance costs over the years.

The average homeowner should expect to spend $800 for professional gutter guard installation. However, the price may be higher for houses with multiple stories or complex roof lines. The cost of materials and labor will also vary by region and location, with prices generally higher in urban areas due to higher hourly rates for trade professionals.

There are many benefits of gutter guards, including a reduction in the need for frequent gutter cleaning and improved water flow. They can help to protect the gutters from corrosion, rust, and mold. They can also help to keep the home safe by preventing the accumulation of flammable debris, such as leaves and twigs. Gutter guards can also prevent fires that can spread through the neighborhood and damage the house’s structure.

In addition, gutter covers can be an effective way to reduce the risk of ice damming. Ice damming occurs when melted snow flows into the gutters and refreezes, creating a blockage. A gutter guard can prevent this by improving the water flow, allowing it to drain through the gutters instead of refreezing.

Homeowners should consider hiring a professional for gutter guard installation, as it is a safer option than cleaning or repairing the existing gutters themselves. In addition, a professional will have access to the best products and can offer warranties or guarantees on their work.

In addition to the cost of materials, homeowners should budget for the gutter guard installation. This includes the cost of labor and materials and any other services required for preparing the gutters before the building. This includes removing obstructions, such as dead trees or large branches, and sealing the joints to prevent leaks. The cost of installing gutter covers will also vary depending on the job’s complexity and whether it requires access to the roof or a ladder.

Before beginning a gutter guard installation, homeowners should evaluate whether they have the necessary tools and skills to complete the job. Ideally, the homeowner should have some DIY experience and feel comfortable working from a ladder at heights. If not, it may be best to hire a professional.

A homeowner should also consider the type of gutter guards right for their home. There are several styles, including mesh, foam, and wire mesh. Each has its advantages and disadvantages. Mesh gutter guards are the most common and typically cost less than other types. However, they can easily become clogged with pine needles and leaves. Foam gutter guards are less expensive than mesh guards but may degrade over time. They are also less effective than mesh and grille guards at blocking debris.

After choosing the right gutter guards, homeowners should measure their gutters to determine the length and width. Then, they should order the materials needed for the project. Homeowners should also make sure they have the proper tools for the job, such as a ladder, tape measure, and screw gun. Having a friend or family member help during the installation is also helpful.

Depending on the product, installers will need to mount the gutter guards onto the gutter lip using self-tapping screws. If the gutter guards did not come with screws, homeowners will need to drill holes into the gutter lip before installing them. They should also cut a 45-degree slant into the end of each gutter guard section to align it with another section. Finally, installers should seal the screw holes with caulk.

Lastly, installers should carefully read the instructions before starting the installation process. Most of the work will be done on the ladder, so homeowners must follow all safety precautions when working at heights. Installers should also be prepared for a messy job and take the time to clean up their workspace afterward. It is also a good idea to have a bucket on hand to catch water from the gutter guards as they are installed.

Having gutter guards can significantly reduce the time you need to get up on your ladder to clean your gutters. They protect the gutter from debris like leaves, pine needles, and twigs that would otherwise clog them. They can also keep water flowing off your roof and away from your home, which prevents foundation problems. It is important to install the right type of guards for your house. A professional can help you determine the best style of gutter guard for your needs.

First, you must ensure your gutters are ready for guard installation. Check the gutters for loose sections or rusting areas. You should also test the water flow through your gutters with a garden hose to see if it flows freely and exits down the downspouts. If it does not, you may need to clean your gutters or reroute your downspouts.

Most home improvement stores sell various types of gutter guards. Some snap into place, while others require you to screw or nail them to your fascia boards with metal hangers. The type of gutter guard you choose depends on the size of the debris that tends to collect in your area. Some guards are designed for large garbage, while others work best on smaller particles like pine needles and twigs.

Gutter guards should be installed in pairs or rows to easily cover your entire gutter system. Once you have your gutter guards in place, cleaning them at least twice yearly is important. This will prevent ice buildup that can block your gutters and lead to water damage.

The most common gutter guards include mesh, screen, and foam. Mesh guards are often the most popular choice for homeowners, as they provide good visibility and are relatively inexpensive. However, they can be clogged with leaves and debris, so it is important to choose a gutter guard that fits the specific needs of your home.

You can complete the installation yourself if you have confidence in your DIY skills and experience working on a ladder. However, if you are uncomfortable on a ladder or need the proper tools, it is best to hire a professional.

Gutter guards prevent debris and vermin from entering your gutter system while ensuring rainwater can always flow through unobstructed. However, they are not a self-cleaning or maintenance-free solution and must be cleaned regularly. You can easily undertake this job yourself or hire a gutter cleaning company to do it for you.

Before you start cleaning your gutters, wear protective gloves and safety glasses to protect yourself from the dirt, animal waste, and pests in the debris. You can also wear comfortable, non-slip footwear and a sturdy ladder to support you. Ask a friend or family member to assist you by standing by the ladder’s base to help prevent dangerous falls.

Begin by assessing what kind of debris accumulates in your gutters during different times of the year. The best way to do this is to climb a ladder and inspect the contents of your gutters, but you can also determine it by looking at what trees and sources of debris are nearby. For example, if you have a lot of full-length pine needles and twigs from mature trees, then a different style of gutter guard would be more suitable than one designed to catch leaf litter.

Next, consider your budget and the time you will spend on this project. Although professional installation is strongly recommended, most homeowners comfortable working at heights can install gutter guards on 1-story houses, as long as they follow proper safety precautions. However, the complexity of your roof and gutter system and the type of gutter guard will affect the installation cost.

Once you’ve selected the ideal product, please read the manufacturer’s instructions carefully and follow them closely. Most products are sold in 4- to 6-ft (1.2- 1.8 m) sections, and you should snap them together using the built-in clipping mechanisms. For added strength, it’s a good idea to use self-tapping screws rather than regular screws. These screw heads drill their hole, so you don’t need to pre-drill holes in the gutter lip.

Why Insulation Removal Is Necessary

Insulation is a great way to keep your home warm and cozy. However, over time it can lose its insulative properties. Insulation Removal Houston is a necessity in this situation. People remove insulation for various reasons, including rodent damage, water damage, and finishing an attic space. Before starting the process, it is important to prepare the area for work.

Damaged

insulation

Insulation can be damaged for a variety of reasons including pest infestation, water damage or general wear and tear. When insulation becomes damaged it loses its ability to help keep your home or business energy efficient. It may also pose health risks and lead to structural damage in some cases. Whether your insulation is damaged in the attic, walls or floors it is best to have it removed and replaced.

Old, damaged and moldy insulation can cause a lot of problems. It is a breeding ground for dust and mold spores which can aggravate allergies. It also poses a risk to your structure as it can rot, deteriorate and potentially compromise the integrity of the attic or walls in which it is located. This is especially important if the affected areas are visible from the living spaces of your property.

It is best to have damaged and contaminated insulation removed by a professional service like Gary’s. This is not something a homeowner can do on their own and should be left to the experts who have the proper tools and equipment to do so safely and thoroughly.

To remove batt or rolled insulation, professionals will clear the attic space to ensure there are no issues with access. They will then roll up the insulation and place it into secure bags. Any leftover debris will then be vacuumed up with an industrial hose. The entire process of removing insulation can take anywhere from four hours to twenty hours depending on the size of the attic and its condition. The more contaminated the insulation, the longer it will take to remove and clean up. The contaminated material will then need to be disposed of in an appropriate manner.

Moldy

Mold is a dangerous problem, and it can be especially damaging to your home’s insulation. It grows easily on any porous surface, and insulation is usually one of those surfaces. If you suspect that your insulating material is affected by mold, you should take immediate action. Mold is toxic to breathe, and it can trigger respiratory problems in sensitive individuals. If you suspect that you have moldy insulation in your home, it is essential to hire a professional company for inspection and removal as soon as possible.

Moldy insulation often appears as spots or patches of discoloration. They can range in color from green to black, and they may be fuzzy or slimy in texture. The mold growth on your insulation can also grow in distinct patterns. Cellulose insulation can be particularly susceptible to moldy conditions, and it is important to ensure that this material stays dry.

If you suspect that your insulating material contains mold, it is important to vacuum the area using a HEPA filter. This will remove loose mold spores and prevent their spread. After the contaminated surface is cleaned, it should be scrubbed with a wire brush and detergent, then rinsed thoroughly. It is also a good idea to use a bleach solution (1 cup of bleach and 1 gallon of water) to disinfect the affected surface. It is also important to dry the affected area before attempting to replace the insulation.

In general, mold on insulation is a sign that there is a moisture issue in the crawlspace or basement of the house. This could be due to a leak in the roof or a water drainage problem that has not been addressed. It is vital to address the moisture issue before reinstalling insulating material in the attic or basement.

Smoke Damage

The force behind a fire drives smoke, soot, and odors deep into the pores of porous materials such as wood, drywall, and fabrics. These items must be cleaned and treated immediately to minimize the damage. If left untreated, the damage will only worsen.

Besides discoloration, the most telltale sign of smoke damage is a persistent odor. This odor may be so strong that it can be detected throughout the property. It’s important to take note of this odor because it can indicate that there is still soot and acidic residue on surfaces. This can cause a host of health issues, including respiratory problems.

Smoke can also corrode metal surfaces, especially if it gets trapped in crevices. If this occurs, it’s essential to have the area thoroughly inspected and professionally cleaned.

The type of insulation that was used in your home should be a good indicator of whether or not it has been damaged by smoke. Older rockwool insulation tends to have a silver gray color and crumble easily, while newer fiberglass is typically lighter in color with a smooth texture.

Smoke-damaged attic insulation should be removed immediately. If it’s salvageable, it should be treated with an odor counteractant and encapsulated to prevent the odor from lingering in your attic space.

It’s also crucial to inspect and replace any insulation that has been permanently damaged by the smoke. This includes attic insulation, floor insulation, and any other insulating material that isn’t salvageable. This step is important because if the attic insulation becomes wet from water damage during the fire, it won’t be able to dry out properly and will create an ideal breeding ground for mold.

Water Damage

Insulation can become wet for a number of reasons, from plumbing leaks to flooding and high humidity. It’s crucial to dry out any wet insulation as quickly as possible to avoid long-term damage.

When cellulose or fiberglass insulation becomes wet, it starts to clump together and loses its insulating potency. It also becomes a breeding ground for mold and mildew which can cause respiratory issues for those living in the home or building. Mould and mildew can also spread to other areas of the home or building causing further damage.

If water soaks into the wall studs and sheathing, it can cause rot and damage the structural integrity of the building. In this situation, a whole wall will need to be removed and rebuilt which is a costly process. Having proper insulation installed in the first place can decrease this risk, as well as minimizing the cost of repairing or replacing walls and other structural components due to rot or mould.

Ensure any leaks are repaired as soon as they are noticed to prevent moisture getting into insulation. The best way to avoid wet insulation is to install moisture-resistant insulation such as Multifoils or Rockwool which are designed specifically to be used in attics and basements. It’s also important to waterproof any parts of the building and insulation with cold-applied coatings or membranes. This can be done by sealing any gaps around windows and doors, soffit vents, gable vents or ridge vents to stop moisture from blowing into attics and soaking insulation. Waterproofing solutions are also available for masonry, concrete and wood to help protect them from water damage.

Hazardous Materials

Many older homes have other types of insulation mixed in with the fiberglass, which complicates the removal and disposal process. Asbestos, for example, is considered a hazardous material that poses health risks to people who inhale or touch it. Removing asbestos from a home requires the use of special equipment and can only be done by professionals.

In some states, it is illegal to dispose of asbestos without a permit from the proper authorities. The same is true for gypsum materials, which can produce hydrogen sulfide gas if sent to landfills.

The Environmental Protection Agency has regulations for the safe disposal of asbestos and other hazardous materials. It also provides guidance on how to handle these materials when they are found in buildings. Before starting an insulation removal project, you should review the EPA guidelines to determine how to proceed.

When working with hazardous materials, the work area should be sealed off from the rest of the space to prevent the spread of particles. It is recommended to clear out any furniture or shelving from the workspace and cover it with plastic sheets or tarps. This will help to protect it from adhesives and other materials used during the insulation removal process.

A person who offers a hazardous material for transportation in commerce, transports a hazardous material to support a commercial enterprise, or manufactures, packages, labels, marks, reconditions, repairs, or tests a package, container, or packaging component must maintain a written emergency response plan and provide the appropriate emergency response information in accordance with 49 CFR 172.11. This information must be made available to any person who requests it. It must be accessible by phone at all times, and the number must be answered live.